
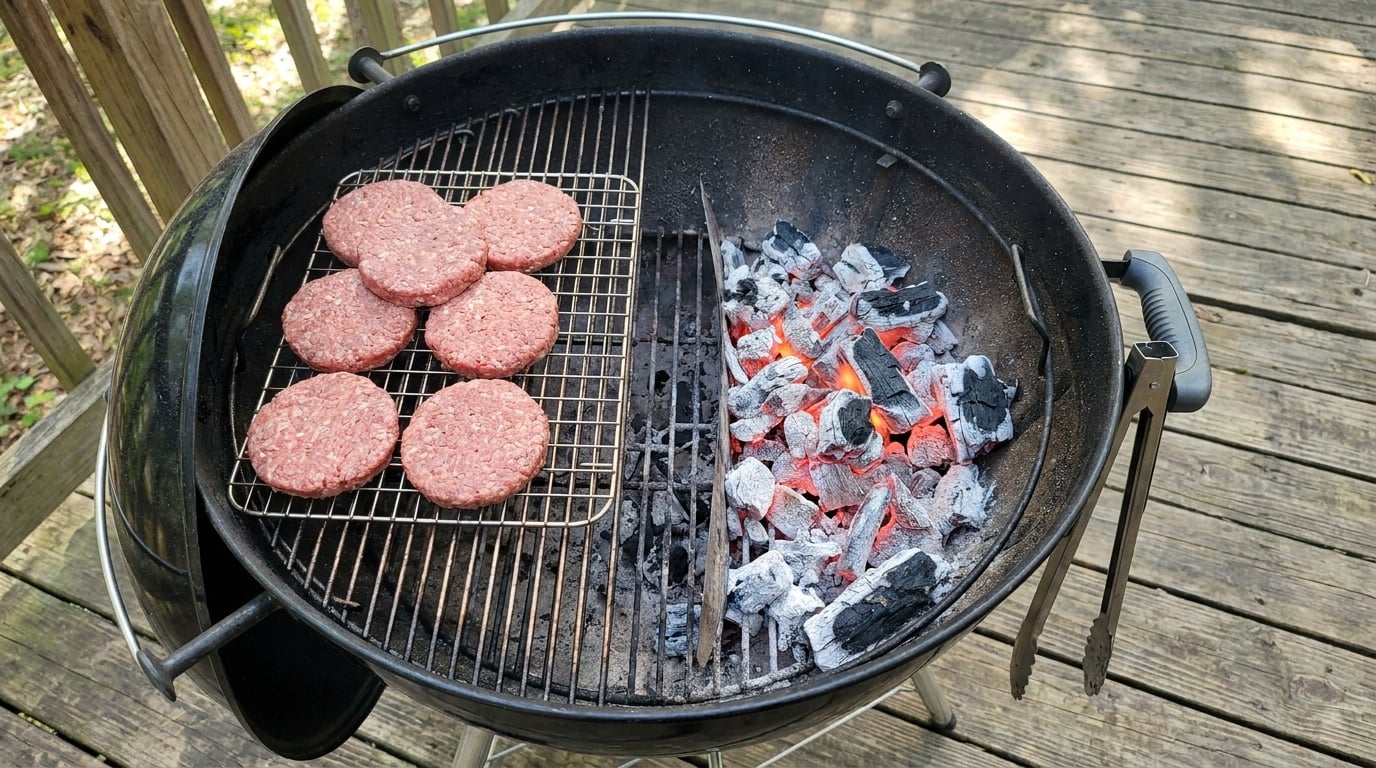
Learning how to set up two zone heat on a grill is the single change that turns a cookout from guesswork into control. You split the cooking surface into a hot side for searing and a cooler side for slow, indirect cooking, then you stop juggling pans between two appliances. On a gas grill it is a matter of which burners you light. On charcoal, it is where you pour the lit coals. On electric, it is how far the element sits from the food.
Set the zones up in about ten minutes, then give the grill a ten to fifteen minute heat soak before anything touches the grate. The whole method is a setup decision, not a technique, which is why it works for beginners and old hands alike.
What You Need to Set Up Two Zone Heat on a Grill
You do not need a fancy grill to do this. You need a surface big enough that both zones stay useful, and you need to be able to verify what the temperature is actually doing.
- A grill with room for two zones. A two-burner gas grill, a kettle or barrel charcoal grill, or an electric grill with room to shift food away from the element. A small portable grill can still be split, but the cool side will be marginal.
- Fuel matched to the job. Liquefied petroleum gas or natural gas for gas grills, lump charcoal or briquettes for charcoal, and nothing extra for electric.
- An instant-read thermometer. This is the one tool that makes the difference. A probe thermometer lets you check the actual grate surface in both zones, not just the air inside the lid.
- Long tongs and a heatproof glove. You will move food between zones mid-cook.
- A chimney starter and a charcoal basket for charcoal setups. The basket is not mandatory, but it makes the banked pile far easier to build and to top up later.
- A water pan or foil pan for long indirect cooks on charcoal, to keep the fire from drying out.
- Two probe thermometers if you are cooking more than one large cut at a time, so you track both without opening the lid.
Your grill’s owner’s manual is worth a skim before you start, especially on a kamado or an electric unit with a sear zone built in. Follow its airflow and clearance instructions over anything you read here.
Step-by-Step
Choose Your Direct-Heat and Indirect-Heat Zones
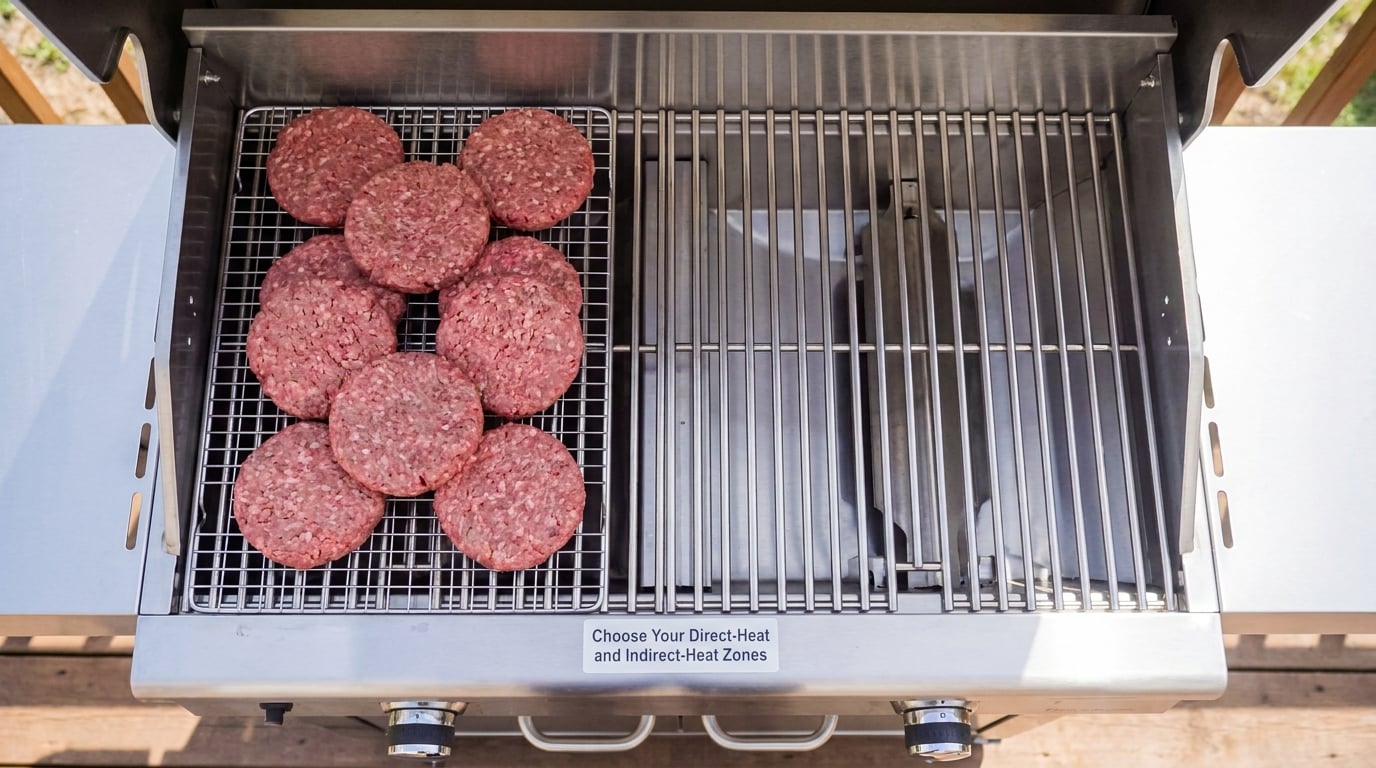
Decide which side of your grill is the direct-heat sear zone and which is the indirect zone, and stick with it for the whole cook. The hot side sits over live flame or coals, so it produces Maillard browning and a sear crust. The cool side has no fuel under it, so heat arrives only as convection and radiant warmth from the lid, which is the gentler heat you want for burgers, chicken, vegetables and anything that needs time.
On a two-burner gas grill, light the back burner only, or light the front one and leave the rear off. Put your hot zone at the side you can reach fastest with tongs, usually the one nearest you while standing at the front of the grill.
On a kettle or barrel charcoal grill, bank the lit coals to one side and leave the rest of the grate bare. Cover roughly one third to one half of the cooking grate with coals, no more than two coals deep. On a kamado, push all the charcoal to one side of the basket, which gives you the same split.
On an electric grill, the direct zone is directly over the element and the indirect zone is on the far end of the grate. If your model has a hinged or adjustable grate, the indirect side is simply the end you lift the food onto away from the coil.
Preheat the Grill and Check Both Temperatures
Close the lid and let the grill heat soak for ten to fifteen minutes with the zones already set. Skipping the soak is the most common reason a two-zone grill feels wrong, because the metal has not caught up with the air yet and the first pieces of food drag the temperature down for everyone.
Vent settings matter most on charcoal. Leave the lid open while the coals ignite and the first ten minutes of cooking, then close it. Leave the top vent partially open during a smoke so convection keeps moving, and open it fully for a sear. Keep the bottom vents clear, and sweep the ash off them about once an hour on a long cook, because ash sealing the lower grate starves the fire and the temperature quietly falls.
Now verify both zones. Put your instant-read probe on the grate, not in the lid air, and check three spots: the middle of the hot side, the middle of the cool side, and the back edge. The hot side should read roughly 450 to 550 degrees Fahrenheit for a solid sear, and the cool side should land near 300 to 350 for indirect roasting. Any spread wider than about 75 degrees between the two sides means the zones are not separated and you should adjust before adding food.
A dome thermometer tells you the air temperature in the chamber, which is useful for a long cook but tells you very little about the surface your burgers touch. For zone work, grate-level readings are the honest measurement. If you have no probe, hold your open hand a few inches above each zone and count seconds before you need to pull it back. Two to four seconds means searing heat, five to six means medium, seven or more means indirect.
Place Food in the Right Zone
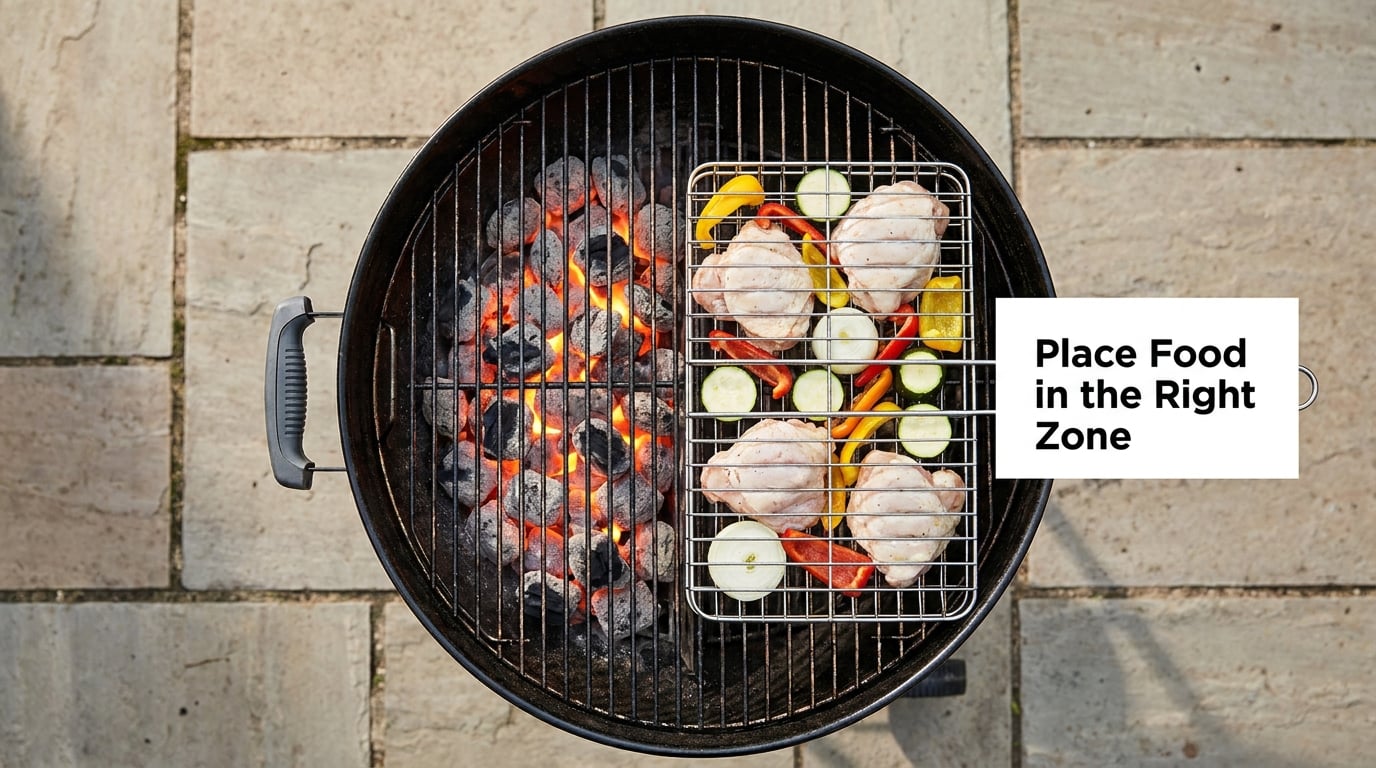
Start the food that needs the longest cook time in the indirect zone, and put the fast, high-heat items in the sear zone last. Burgers, boneless chicken thighs, sausages, pork chops and vegetables belong on the cool side until they are nearly done, then move to the hot side to pick up char. Steaks, scallops and burger patties that you want well crusted go on the hot side from the start.
Use the move itself as a cooking tool. A reverse sear is the cleanest version: bring a thick steak to about 120 to 125 degrees Fahrenheit slowly in the indirect zone, then give it 30 to 45 seconds a side in the sear zone. The crust forms at the end while the center stays juicy, and the two-zone setup is what makes that sequence possible on one grill.
Use a separate wire rack set over the indirect zone as a warming shelf, or a small side burner, to hold finished meat at 140 to 150 degrees Fahrenheit so it does not dry out or cool off while the rest of the crowd is still eating.
Check doneness with a thermometer every time, not guess from color or from how it feels in your hand. Poultry needs 165 degrees Fahrenheit, ground meat including burgers needs 160, and whole cuts of beef, pork, lamb and fish need 145 with a three minute rest. Those are the numbers I cook to, and they remove all the ambiguity from the zone decisions.
Common Mistakes
Starting food before the grill is fully heated. The zones collapse the moment cold food hits the grate. Heat soak first, then verify with a probe.
Putting too little fuel on the hot side. This is the top complaint on grilling forums: bank the coals and the fire never climbs past 300 degrees. If the hot zone will not hold searing heat, you banked too little, so use closer to half the grate and no more than two coals deep.
Trusting the burner labels. The printed high and low settings are not calibrated to your grill. Measure the two zones with a probe and adjust from there.
Overcrowding the cool side. A pile of food on the indirect side radiates heat into itself, and that zone is no longer indirect. Cook in batches or spread food out with real gaps between pieces.
Opening the lid constantly. Every opening on a charcoal grill drops the chamber temperature noticeably and dumps heat. Use a probe and open once, or not at all.
Sealing the bottom vents with ash. A long cook needs the fire fed by air from below. Sweep the grate over the ash catcher every hour or so.
Forgetting wind. Wind direction decides which side should hold the coals. Put the fuel on the downwind side so the flame is not blown across your food, and expect to add fuel sooner in cold weather. Grilling in 100 degree weather works fine; it just means less charcoal, more lid-open time and a shorter fuel budget.
Placing a charcoal basket dead center. One basket in the middle gives you one hot ring and two cool edges, which is not a two-zone fire. Move the basket hard to one side.
Tips for Better Two-Zone Grilling
Let each zone do one job. The direct zone is for browning, the indirect zone is for cooking through and for smoke. Trying to slow-roast on the sear side means turning the burner down, which is what makes gas grill zones drift apart.
Add charcoal to the hot side in small amounts. Dump half a chimney at a time on the existing pile rather than spreading fresh coals across the whole grate. A small hot basket or a foil packet of coals tucked against the banked pile extends a long cook without rebuilding the fire.
Use a water pan in the empty side on long cooks. It adds moisture to the convection heat and helps the cool zone hold a steady temperature instead of spiking.
Control flare-ups with placement, not with the lid. Move the food over the indirect side when a flare starts, finish the browning on the hot side, and give it a minute. Fat drips on a sear zone are normal; the fix is the cooler side you already built.
Go to three zones when the crowd is split. A sear side, a middle slow zone and a far side holding zone at 140 to 150 degrees lets you serve ribs, steaks and a tray of roasted vegetables at the same time without a second appliance.
On a kamado, all the fuel to one side is enough. The thick ceramic body evens out temperature on its own, so leave the top vent cracked and add a small piece of oak or a half chimney on the coal side only when you want smoke flavor.
On an electric grill, move the food instead of the heat. Set the thermostat for the low end, put slow items on the far end of the grate, and sear them back over the element for the last minute. Keep the panel closed while you work and treat the far end as your indirect zone.
Give the grill ten minutes after any fuel change. The zones rebalance quickly once the fire responds, and food placed in the first minute after a chimney add is almost always undercooked on the cool side.
Frequently Asked Questions
What temperature should the two zones be on a grill?
Aim for roughly 450 to 550 degrees Fahrenheit on the direct-heat side and 300 to 350 on the indirect side. That gap gives you a real sear zone and a gentle roasting zone at the same time. Measure both with an instant-read probe on the grate, not the dome thermometer, which reads air rather than surface. If the difference is under about 75 degrees, your zones are not actually separated.
Can I make two-zone heat on a charcoal grill?
Yes, and charcoal is where the method started. Light a chimney, pour it out, and bank the coals to one side of the grate so they cover about one third to one half of it and sit no more than two coals deep. The bare side becomes your indirect zone, heated only by the convection and radiant heat of the closed lid. A charcoal basket on one side makes the pile far easier to build and to top up later.
Should I put burgers on the hot side or cool side?
Start burgers on the cool side and finish them on the hot side. Indirect heat renders the fat and cooks the patty through without burning the outside, and a minute or two in the sear zone builds the crust you actually want. Ground meat must reach 160 degrees Fahrenheit internally, so check with a thermometer. Thin smashed patties can go straight to the hot side because they cook in under three minutes a side.
How do I keep the cool side from becoming too hot?
On a gas grill, close the burner under the cool side or turn it to its lowest setting instead of leaving it on high. On charcoal, keep the fire smaller, bank the coals tighter to one side, and leave the top vent partially open so heat escapes instead of collecting. Watch the lid temperature too, since a hot dome keeps cooking food on the far grate even when the coals are not under it.
Do I need a grill thermometer to set up two zones?
An instant-read probe thermometer is the one tool that makes zoning verifiable, and a cheap one is enough. Without it, you are guessing, and a grill that reads 350 in the dome can still have a grate running 200 on the cool side. The old fallback is a hand test: hold your palm a few inches above each zone and count seconds, where two to four means searing heat and seven or more means indirect.
How do I use two-zone heat to prevent flare-ups?
Indirect heat is your flare-up control because fat drips land on a grate with no fire under it. When a flare starts, move the food to the cool side, let the flame die down, and return it to the hot side for a short finishing sear. Keeping the cooler zone genuinely cooler also stops the chimney effect, where rising heat recirculates under the lid and drives flare-ups on their own.
Conclusion
Heat one side hard, keep the other side cooler, and verify both temperatures before any food goes on the grate. That is the whole two-zone grilling setup: one burner lit or coals banked to one side, a ten minute heat soak, then a probe check that shows about 75 degrees or more between the two zones. From there you can sear, slow-roast, smoke and hold food on the same grill, and never move a pan between two appliances again.